Big Sister Helment
~Supplies:~
about 2-3 yards of Fiberglass
resin
kids bouncy ball or basket ball (something round and bigger than your head, because remember the big sister was designed after a diver suit. And those helmets are HUGE XD)
Scissors
Latex or non melting gloves (Resin will melt some kinds of gloves XD We found that out the hard way lol)
Rope
cake pan
sanding paper or sanding drill
plastic tubing
flexible conduit
cookie cutters/biscuit cutters
red film gels
4 plastic circle disks- ranging in sizes from small to big (you'll see where these come in at ^_^)
**easy cast resin
a half orb mold
blue transparency resin dye
(if you want to cast your own blue orb that she's got on top of her head, if not look for a toy ball or use a Christmas ornament whatever you feel like using ^_^)**
Small vent plates
That's allot of stuff But you don't have to use everything I did, whatever feels comfortable for you. ^_^
~starting~
Ok first what you want to do is get one of those big kid's bouncy balls. There really cheap and when you’re done making the helmet there easy to pop. XD Anyways take that bouncy ball and make a stand (trash can works lol) it’s just to keep the ball steady as you work. Then cut out nice small pieces of fiberglass, making sure you lay them on the ball and they lay FLAT. This is very important! If the fiberglass gets bubbles while it dries it ruins the whole things and is a pain to get rid of. Oh and before to cover the ball in Pam spray because this will help keep the ball from sticking to the fiberglass, since you want to take it out once your done.
* I would suggest having a parent or friend help you while your doing this part. Because it'll be allot safer and less stressful. ^_^*
Anyways once you have enough fiberglass to do one whole side, and it looks like they'll lie nicely. You can now start mixing your Resin, make sure to follow the instructions very closely because if the mix is wrong it will be tacky from not curing right. And always wear gloves while working with resin, Resin is toxic so make sure you’re working outside, wearing gloves, and wearing a mask. XP because the fumes are HORRIBLE
Once the Resin is mixed you have to quickly (but not messy quick) put each piece of fiberglass on the ball and paint on the resin, making sure each layer has a good soaked look. Wait for your first layer of Fiberglass and resin to cure before turning the ball over and starting the other side. (Just repeat this process till you've got about 3 good layers on the whole ball but be sure to leave a area for your head lol)
*If you’re getting bubbles just slowly and gently apply pressure and work it around till the bubble goes away. BE careful because the fiberglass likes to move around allot and sticks real bad.
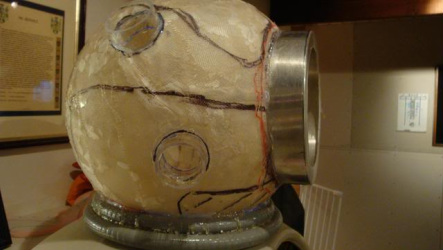
Once the whole ball is covered let it cure for a few days outside, this will make sure everything is hard and the smell will start to go away. Once it's hard pop the ball and take out the remains.
This is what it should kinda look like;
about 2-3 yards of Fiberglass
resin
kids bouncy ball or basket ball (something round and bigger than your head, because remember the big sister was designed after a diver suit. And those helmets are HUGE XD)
Scissors
Latex or non melting gloves (Resin will melt some kinds of gloves XD We found that out the hard way lol)
Rope
cake pan
sanding paper or sanding drill
plastic tubing
flexible conduit
cookie cutters/biscuit cutters
red film gels
4 plastic circle disks- ranging in sizes from small to big (you'll see where these come in at ^_^)
**easy cast resin
a half orb mold
blue transparency resin dye
(if you want to cast your own blue orb that she's got on top of her head, if not look for a toy ball or use a Christmas ornament whatever you feel like using ^_^)**
Small vent plates
That's allot of stuff But you don't have to use everything I did, whatever feels comfortable for you. ^_^
~starting~
Ok first what you want to do is get one of those big kid's bouncy balls. There really cheap and when you’re done making the helmet there easy to pop. XD Anyways take that bouncy ball and make a stand (trash can works lol) it’s just to keep the ball steady as you work. Then cut out nice small pieces of fiberglass, making sure you lay them on the ball and they lay FLAT. This is very important! If the fiberglass gets bubbles while it dries it ruins the whole things and is a pain to get rid of. Oh and before to cover the ball in Pam spray because this will help keep the ball from sticking to the fiberglass, since you want to take it out once your done.
* I would suggest having a parent or friend help you while your doing this part. Because it'll be allot safer and less stressful. ^_^*
Anyways once you have enough fiberglass to do one whole side, and it looks like they'll lie nicely. You can now start mixing your Resin, make sure to follow the instructions very closely because if the mix is wrong it will be tacky from not curing right. And always wear gloves while working with resin, Resin is toxic so make sure you’re working outside, wearing gloves, and wearing a mask. XP because the fumes are HORRIBLE
Once the Resin is mixed you have to quickly (but not messy quick) put each piece of fiberglass on the ball and paint on the resin, making sure each layer has a good soaked look. Wait for your first layer of Fiberglass and resin to cure before turning the ball over and starting the other side. (Just repeat this process till you've got about 3 good layers on the whole ball but be sure to leave a area for your head lol)
*If you’re getting bubbles just slowly and gently apply pressure and work it around till the bubble goes away. BE careful because the fiberglass likes to move around allot and sticks real bad.
Once the whole ball is covered let it cure for a few days outside, this will make sure everything is hard and the smell will start to go away. Once it's hard pop the ball and take out the remains.
This is what it should kinda look like;

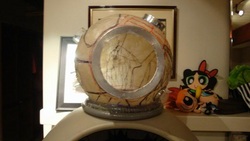
once it looks like this start to draw on the ball, marking where each hole is going to be. Just like I did in the above photo XD(please ignore the bad anime face ) Now comes the fun part lol NOT. Ok what you want to do now is start cutting out those holes, I highly recommend getting a small hand drill they come in handy with this. Because a knife is way too hard to cut through fiberglass and it leaves it jagged. Once holes are cute it should look like this;
Now you see the plastic tubing coming out of the holes, you can find those at any home depot or if there is a plastic store near you. That will be your best bet on getting those and each one was used for marking the holes, since there different sizes. Remember that because if the hole is too big you'll have to add some hot glue on the inside to keep it in place. Not a big deal but it's easier to work with if they fit. For the big hole, that sits on her right side on her head that has the glass bubble. lol I took a cookie/biscuit cutter and hot glued it in the hole, just like the other plastic tubing.
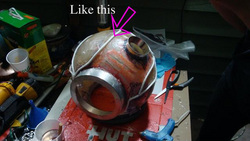
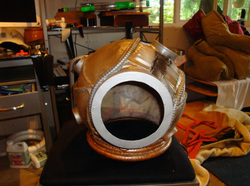
Once each plastic tubing is in it's rightfully spot, hot glue in the inside of the helmet wear the plastic tubing and the helmet meet.( This will keep them in place and keep the glue out of sight) Now for the face plate, take a cake pan which is about 1 and half deep inches deep. And cut out a hole, like this;
Once each plastic tubing is in it's rightfully spot, hot glue in the inside of the helmet wear the plastic tubing and the helmet meet.( This will keep them in place and keep the glue out of sight) Now for the face plate, take a cake pan which is about 1 and half deep inches deep. And cut out a hole, like this;
Once done place the cake pan going from the inside, out. Then just hot glue where the pan and helmet meet, in the inside. Now once everything is set and glued, you can make the rings that rest under the helmet. What you do is take the flexible tubing and make two circles one just a tiny bit smaller than the other. Once cut, glue them together with ether gorilla glue or Epoxy glue. (Something sturdy and will last for a long time) Once the circles are done, take the smallest one and place it on top of the larger one. Now take some glue (Epoxy, E6000, or Gorilla) and glue them together, and to keep them from moving around just take some duck tape and tape them together carefully in three spots. (More if needed)
Now that we have the neck peace done, you can attach it to the helmet piece. By gluing them together, just like you did for the neck piece. To make sure it'll dry right take some duct tape and tape the neck piece to the helmet. Once glued you should let dry/cure all the way so give it a day or two, keep checking if the glue is drying or not. Because sometimes the glue; will take longer to dry/cure in different temperature.
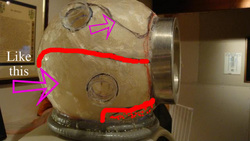
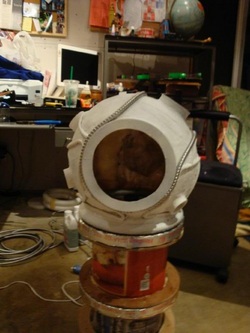
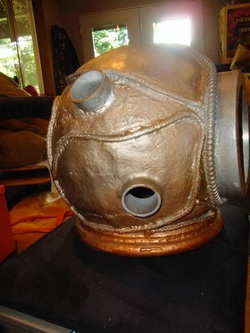
Now that everything is dried and in place, I'd say start drawing on where you going to place more fiberglass and the rope. Like I did here;
(This helped me when we started adding more dimension to the helmet and added the rope which outlined the raised level of fiberglass. Giving it a wrapped metal look)
Now that we have the neck peace done, you can attach it to the helmet piece. By gluing them together, just like you did for the neck piece. To make sure it'll dry right take some duct tape and tape the neck piece to the helmet. Once glued you should let dry/cure all the way so give it a day or two, keep checking if the glue is drying or not. Because sometimes the glue; will take longer to dry/cure in different temperature.
Now that everything is dried and in place, I'd say start drawing on where you going to place more fiberglass and the rope. Like I did here;
(This helped me when we started adding more dimension to the helmet and added the rope which outlined the raised level of fiberglass. Giving it a wrapped metal look)
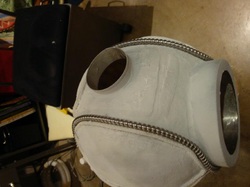
Once everything is drawn on, your going to have to deal with resin and fiberglass again. XP Yah I know the smelly stuff, but once you’re done with this step you don't have to work with it again. ^_^ Anyways start cutting out pieces that fit the drawn area, make sure you, you make enough to create a raised look. Once every things cut out, start mixing your resin again like before. Then start placing the fiberglass and resin on the helmet, once your done let it dry for a day then start gluing on the rope. Making sure it goes on the edges of the raised fiberglass, this will help give it the look of metal.
It should like this;
It should like this;
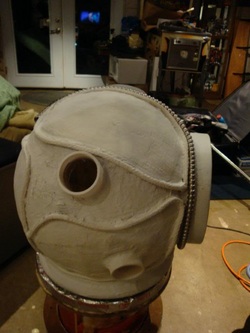
Now it's time to sand, if you've got a power sander this is a great time to use it. If not sanding is going to take a while, but once your done sanding then it's time for paint primmer. Just coat the whole helmet and neck piece with 2-3 coats. Once the paint dries, then you’re going to have to glue on the flexible conduit, make sure it goes under the face plate and around, ending about half way on the helmet.
Like so;
Like so;
Now on to the fun part, PAINTING ^-^
First what your going to need is spray paint in these colors.
First what your going to need is spray paint in these colors.
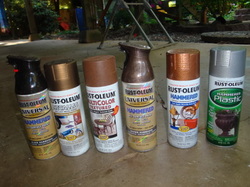
Once you have the colors you want, it's start to paint on a first coat. Take your lightest color (The copper is what I started with) and paint the whole head. Don't worry about covering anything, because there mostly copper and you can go back and paint it a different color later anyways. Once you have the base color coat, it's time to add the dark beat up spots. What I did was take the hammered sprays and dark grey and just lightly sprayed in spots and did long strokes. Basically just trying to make it look like it's been worn for a long time.
After a while it should be kind of like this;
After a while it should be kind of like this;
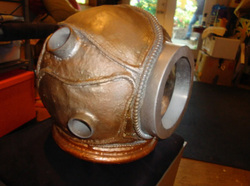
Now it's time to add a darker color and add shadows, to do this take the brass color and spray in different directions making sure there short and at a distance. So you don't cover up to much of the light colors, then it's time for the really dark beat up spots. This is very simple, but you must take your time with it. Just grab a small sponge and some black acrylic paint or spray paint, and lightly get some on the sponge. Then take the sponge, dab and scrub in different areas, making sure the stay small. After doing this for a while it'll start looking like this.
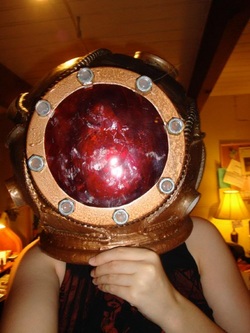
Now the painting is done and everything is dry, time for the decorations. First are the lenses, to make these you’re going to need to buy clear circle plastic disks. One for each size of hole: the biggest one for your face; once you have these disks. You’re going to glue on the red film gel on both sides of the disks.
*Glue them on with E6000 CLEAR
*Remember that the one on the right does not need a red plastic disk.
Now let these dry for 3 days, once dried cut away the remaining red film gels the hang off the side. Now take them and place them on there hole, hot gluing them in place on the inside of the helmet.
*If there not fitting, then you’re going to have to sand them till they fit.
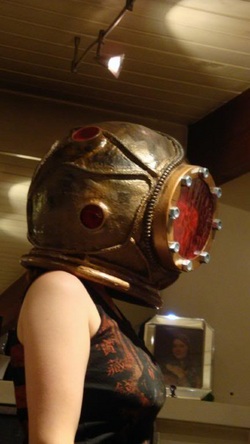
Now you’re almost done, but you still need to add the nut bolts which on the face plate. Just grab some bolts and hot glue them in place and fill in the holes. Like so;
*Glue them on with E6000 CLEAR
*Remember that the one on the right does not need a red plastic disk.
Now let these dry for 3 days, once dried cut away the remaining red film gels the hang off the side. Now take them and place them on there hole, hot gluing them in place on the inside of the helmet.
*If there not fitting, then you’re going to have to sand them till they fit.
Now you’re almost done, but you still need to add the nut bolts which on the face plate. Just grab some bolts and hot glue them in place and fill in the holes. Like so;
Finally thing to do is the piece sticking out.
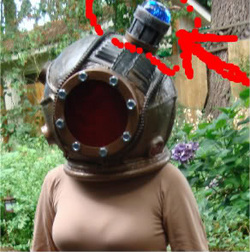
To do this grab a plastic tube 3 inches tall, some belts or foam, a plastic lid, and your bubble. Take the tube and cut pieces of belts or foam an inch wide and hot glue them onto the tube. Leaving a little gap in between each one, once the tube is covered, spray paint it with a grey and brass color. Take the plastic lid and cut a hole in the middle, not to big just enough so light can shine through, so half of how wide your tube is. Hot glue it to the top of the tube and spray paint again, the finally you can hot glue your bubble on top of the tube. Then take the completed tube and hot glue it into the biscuit cutter.
*Make sure to glue on the seam in the inside of the helmet.
You’re done!!!!! ^_^
*Please do not freak if you see the different colors on the helmet. When painted the helmet will change colors in different lights just like hers in the game. So don't worry if it looks grey below it's really the same color brass and copper. ^_^
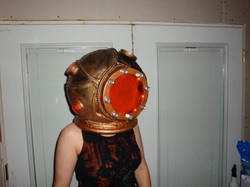
Now your helmet should look like this;
*Make sure to glue on the seam in the inside of the helmet.
You’re done!!!!! ^_^
*Please do not freak if you see the different colors on the helmet. When painted the helmet will change colors in different lights just like hers in the game. So don't worry if it looks grey below it's really the same color brass and copper. ^_^
Now your helmet should look like this;
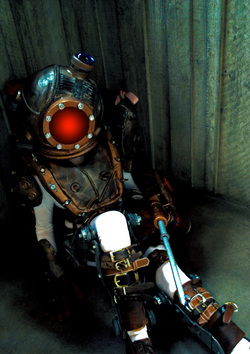
If you'd like to know how to make it light up, it's just wedding led lights that you get in the wedding section at Joanns that are glued in on the inside of the cake pan and put in foam for the small pipes on the rest of the helment. Anyways thank you everyone for your support, and if your confused about anything or want to know more. Please feel free to email me
